
Here are some photos from a job I did a few years ago. This was to be a new home for a newly single man. I would describe his style as modern and contemporary. My first meeting for this project was to see the place, meet the Interior Designer and give some ideas for a bathroom. I ended up getting the original bathroom, in addition to painting the foyer, an accent wall master bedroom and master bathroom. The homeowner really liked my ideas.
The original bathroom had a grey tiled shower and white cabinets. We went with a plum brown strie over light grey. After completing the walls, I recommended doing grey storm clouds on the ceiling. It really added to the room.

The next project was the foyer. He really liked my sample of a striped Luster Stone. For some reason, this reminds me of a tuxedo. I’m not sure why, it just gives me the feel of manly elegance. What a great statement to make when you first enter his home.
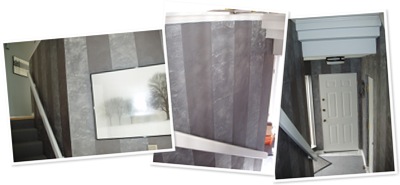
On to the next wall. For his accent wall, which is actually the backside of his kitchen. He had stated that he really likes the look of slate. So, my response to that was “let’s go pick out a piece of slate to duplicate”. This turned into our first shopping trip of many to come. We selected a piece of slate, so off to my studio to replicate it. (Now, I’m really wishing I kept that piece of slate to show the comparison.) The sample turned out awesome. It was a four layer process with textures and blending colors on the wall. I think it turned out really nice and really compliments the colors throughout the house.

I can’t remember if the master bedroom or master bathroom came next. I think it was the master bedroom.
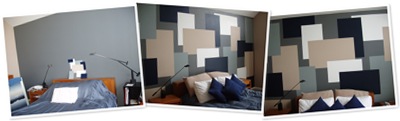
After working there awhile on the other rooms, I really felt like I was getting to know his taste and personality. He had just had is master bedroom painted, but I felt it was really missing something. I came up with the idea of colorblocking on the headboard wall. From there, he added his idea of incorporating “the perfect rectangle”. This is something he is very interested in, so he gave me the measurements for “the perfect rectangle”. To date, I think this wall has the most dramatic impact of any room I’ve done. It really draws you into the room (I guess that’s probably not a bad thing for as single guy).
The master bathroom ended up requiring a little trust on his part. As you may have notices there is a theme going of blues and greys. The master bathroom was no exception. We decided we were going to go with a textured finish with a color wash over it. The base was a light tan and he wanted a blue color wash on top. I had suggested adding both blue and brown for the color wash. He didn’t like the idea of the brown, so I did as he requested. Unfortunately, when I started, we decided it looked like a dead persons flesh… not a very pretty sight I know. Here is where the trust came into play. I suggested once again adding some brown and blue blending them as I go. (Of course, with the guarantee it would be redone if he didn’t like it.) Lucky for me, he really liked it and I was able to finish the room.

After all the work of painting and decorating was done, it was time for him to move in and have a party. As a housewarming gift, I decided to paint him yet one more thing. I created this piece of artwork to go in his master bathroom.

This project really was a learning experience for me. It was my first job that started as one room and turned into several rooms. I was also able to assist in a lot of the decorating and shopping. Not only did I have fun working on this project, I also gained a new friend.
Yet another reason I love my job.


 This last one isn't photographing the way I'd like it too. It looks pretty cool in person. It has an off white base coat. Next, I applied the clear halographic foil. I cut/tore the foil and placed it in sections, letting some pieces overlap to create more depth and interest. Finally, I added a turquise colorwash over the entire thing. I think this would be a cool look in a small bathroom (Joyce, your bathroom off the front door comes to mind). It would also look pretty cool on a ceiling.


 Once I got started, my dad said he wanted a mouse hole too. So, I added a little mouse hole and a mouse... actually, it's a little bigger than I'd like, so it's more of a cute little rat.
  I'm very happy with the way the room turned out, it fits in perfectly with their rustic decor.