Showing posts with label bathrooms. Show all posts

Friday, May 8, 2009

My Current Project

Here is the house I have been working on for the past couple of weeks.  The homeowners have been remodeling their house and had some faux finishing done.  They weren’t happy with the way their last faux finisher did the dining room.  They contacted me to redo it.  I redid the silver stripes and completely changed the ceiling.  The ceiling had a sponged look before that didn’t compliment the walls at all. Sorry, I didn’t get any before picture of this room.  Here is the completed room.  I can’t wait to see what it looks like with the furniture in it. DSC_0067DSC_0064

I also repainted their bathroom.  It had a venetian plaster type finish.  I think they were going for a marble look, that didn’t turn out quite right.  So, I repainted it with a bronze linen type look.   After several days, the husband decided he didn’t like this either.  It’s too close to the wood tones, so I’ll be lightening it.


I was also asked to change the living room.  It’s a green plaster, but too much green for the homeowners.  I troweled some of the gold I used for the dining room ceiling over the green.  This toned down the green and also helped the two rooms flow a little better.

DSC_0171

DSC_0173


The after picture didn’t photograph very good.  The gold was still wet and looks a lot more blotchy than it actually is.  It has more of a subtle marble look to it.  I’ll have to get another picture of it when I go back.

I am also doing the bedroom wall that they didn’t like.  The headboard wall had a cloud-like finish on the upper half.  I had suggested to do a colorblock technique and incorporate the two different blues, some silver, brown/bronze and white.  Well, I got it drawn out and started painting it.  To my surprise the next day I got a call and the husband thinks it’s too contemporary.DSC_0003 DSC_0004


I must admit, this one was a little disappointing.  I feel it really looked nice with their headboard and bedding.  Oh well, it’s back to the studio to come up with another idea.

Sometimes, these things happen.  It’s hard for some people to visualize what an entire wall is going to look like from just a small sample.  I enjoy the challenge and look forward to finding the perfect solution for this room.  I’ll post more when it gets finished.

Tuesday, April 14, 2009

My Cabin Bathroom

bathroom floor1This is my bathroom.  I started this project because I wanted to test painting over linoleum.  I told my husband I wanted to paint tree stumps on the floor with leaves scattered around it.  His comment was “you want to do what”.  Fortunately, I’ve yet to do something that he hasn’t liked, so I’ve still the freedom to paint as I please. 


We have a cabin in Northern Wisconsin and I just love all the cabin decor you can find.  So, to go with my tree stumps I decided to make this my little cabin away from the cabin.

On the walls, I stenciled some dragon flies with Venetian Plaster.  Then, I applied three more coats of Venetian Plaster over top.  This makes them very subtle.  Can you see it next to my towel hook?bath5bath 1

bath 3


After the work was all done, I got to embellish the room with my cabin items.  I absolutely LOVE this room, it makes me smile and reminds me of Up North.

The only thing I STILL need to do is add a picture of our Cabin to the wall about the towel bar.  I haven’t decided if I want to paint one or just do a drawing.  After that’s done, this room will be perfect.

Wednesday, February 4, 2009

Mead’s house.

Here is a project I did for some very good friends of mine.  I’ve known them for about as long as I’ve known my husband.  It’s my husbands’ best buddy from high school.  I’ve painted every bedroom in their house and one of the bathrooms.  Today, I’m going to just show you the bathroom and two of the bedrooms (the other three were just painted, no faux finishing).

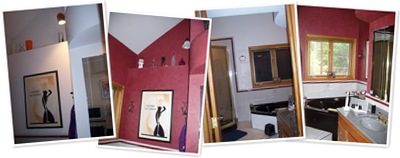
This bathroom is one they HATED.  It’s the bathroom off their master bedroom.  As you can see in the before pictures, it had plain white walls, with grey tiles and a burgundy accent tile.  Ideally, they would like to have gutted the entire thing.  However, since that wasn’t going to happen, I suggested “let’s just paint it”.  Our main goal was to make the burgundy tile work with the rest of the room.  Well, what better way to do that than make the walls burgundy.  I applied venetian plaster to the walls.  As you can see, it totally transformed the room.  I also painted the drywall around the tub a glossy black.  I think that made a big difference too. 

This is one of the most dramatic before and after examples I’ve got in my portfolio.  It was a lot of work; three coats of troweled on venetian plaster and a protective topcoat.  Absolutely worth it in the end.

This next room is the master bedroom.  It is just off the above bathroom. We wanted to make sure the bathroom and bedroom colors complemented each other.  For this one, I troweled on a base to give it some texture.  Then, I painted a base coat over the texture.  Finally, I did a colorwash to highlight the highs and lows of the textured walls.  As you can see it really warms up the room.  I just love the way these before and after shots look.  It’s amazing how it transformed the space from cold to warm and cozy.  And it was done with just a little faux finishing….. I love my job!

mead master 1 before

mead master 1 after


The most recent room I did for them was their daughter’s room.  This was really fun, because I got to do a surprise makeover of her room.  I was told she wanted orange walls and l think they said she liked purple and lime green too.  So, I went to IKEA to find some inspiration. 

I found a beautiful duvet cover and went from there.  I painted the walls a light orange (I felt like it was a big band-aid before the finishing touches were added).  I then painted the ceiling dark purple with a hand painted design in light green.  On one of the walls, I also painted some panels.  The panels were done the opposite of the ceiling, light green background with the design hand painted in purple.

The ceiling is definitely a one of a kind.  My neck was killing me by time I finished it.  If I ever do it again, I will used a stencil.  Oh, who am I kidding.  If someone asks, of course I’ll do it again.  It’s just like childbirth, you forget how much it hurts after awhile.  It looks really cool when you are laying on the bed looking up.  It was a successful makeover, she loved it.

Thank you to The Mead’s for giving me the freedom to “play” with their rooms.  I love you guys!

Wednesday, January 28, 2009

The Bachelor’s Pad

Here are some photos from a job I did a few years ago.  This was to be a new home for a newly single man.  I would describe his style as modern and contemporary. My first meeting for this project was to see the place, meet the Interior Designer and give some ideas for a bathroom.  I ended up getting the original bathroom, in addition to painting the foyer, an accent wall master bedroom and master bathroom.  The homeowner really liked my ideas. 

The original bathroom had a grey tiled shower and white cabinets.  We went with a plum brown strie over light grey.  After completing the walls, I recommended doing grey storm clouds on the ceiling.  It really added to the room.

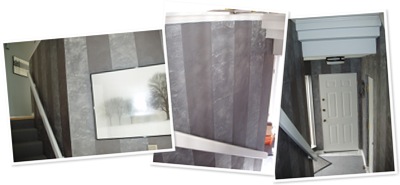
The next project was the foyer.  He really liked my sample of a striped Luster Stone.  For some reason, this reminds me of a tuxedo.  I’m not sure why, it just gives me the feel of manly elegance.  What a great statement to make when you first enter his home.

On to the next wall.  For his accent wall, which is actually the backside of his kitchen.  He had stated that he really likes the look of slate.  So, my response to that was “let’s go pick out a piece of slate to duplicate”.  This turned into our first shopping trip of many to come.  We selected a piece of slate, so off to my studio to replicate it.  (Now, I’m really wishing I kept that piece of slate to show the comparison.)  The sample turned out awesome.  It was a four layer process with textures and blending colors on the wall.  I think it turned out really nice and really compliments the colors throughout the house.

I can’t remember if the master bedroom or master bathroom came next.  I think it was the master bedroom.

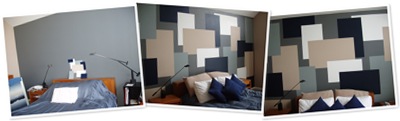
After working there awhile on the other rooms, I really felt like I was getting to know his taste and personality.  He had just had is master bedroom painted, but I felt it was really missing something.  I came up with the idea of colorblocking on the headboard wall.  From there, he added his idea of incorporating “the perfect rectangle”.  This is something he is very interested in, so he gave me the measurements for “the perfect rectangle”.   To date, I think this wall has the most dramatic impact of any room I’ve done.  It really draws you into the room (I guess that’s probably not a bad thing for as single guy).

The master bathroom ended up requiring a little trust on his part.  As you may have notices there is a theme going of blues and greys.  The master bathroom was no exception.  We decided we were going to go with a textured finish with a color wash over it.  The base was a light tan and he wanted a blue color wash on top.  I had suggested adding both blue and brown for the color wash.  He didn’t like the idea of the brown, so I did as he requested.  Unfortunately, when I started, we decided it looked like a dead persons flesh… not a very pretty sight I know.  Here is where the trust came into play.  I suggested once again adding some brown and blue blending them as I go.  (Of course, with the guarantee it would be redone if he didn’t like it.)  Lucky for me, he really liked it and I was able to finish the room.

After all the work of painting and decorating was done, it was time for him to move in and have a party.  As a housewarming gift, I decided to paint him yet one more thing.  I created this piece of artwork to go in his master bathroom.al's bath 4

This project really was a learning experience for me.  It was my first job that started as one room and turned into several rooms.  I was also able to assist in a lot of the decorating and shopping.  Not only did I have fun working on this project, I also gained a new friend. 

Yet another reason I love my job.

Thursday, January 15, 2009

The "Outhouse" project

This has got to be my favorite project I've done. My parents live in a log cabin, the one I grew up in. Off the kitchen is this little half bath. I think from the time I started painting I was telling them they should let me paint it to look like an outhouse. Finally, a couple years ago they gave me the go ahead. I wood grained the walls (except the existing log wall), wood grained the door and built a wood bench around the toilet. I also wood grained the cabinet and replaced the doors for a more rustic look.


I started by patching and prepping the walls. My mom had already removed the wallpaper that was there.


Once the base coat was dry, I taped of the sections for each board and wood grained them. I let them dry, then taped of and did the next section.
Once the walls were wood grained to look like boards, I added the shading between the boards. I also added some knot holes and nails at the top and bottom of each board.

I followed the same technique for the doors, but also added the "Z" cross boards on the front and back of the door.
I love the way this door turned out. It sure shows how a little shading and highlights can give it dimension. Would you have guessed it's a flat door?
Once I got started, my dad said he wanted a mouse hole too. So, I added a little mouse hole and a mouse... actually, it's a little bigger than I'd like, so it's more of a cute little rat. I'm very happy with the way the room turned out, it fits in perfectly with their rustic decor.

Recently, I was there to paint the kitchen walls outside the bathroom to look like stone. I'll post more on that later.