Showing posts with label samples. Show all posts

Wednesday, March 4, 2009

My EXPO booth.

P2280008P2280009 


For weeks I’ve been creating columns, painting panels and refinishing furniture.  All this in preparation for our local business EXPO.  Well, last weekend was the EXPO and it was VERY successful.

I was very happy with the way my booth came together.  I’d visualized it in my head for months.  It’s awesome when my visions actually become reality (there are many times I can’t get that to work out).  I think this years booth looked much more put-together and professional than last years.  I’m already thinking of a few minor changes for next year, but for now it’s done.
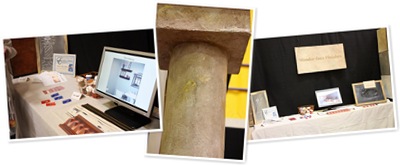
photos by Joyce http://perfect-beginning.blogspot.com/

The EXPO was very busy this year.  There were 900 adults that came through the first day alone.  I never heard a final count for Sunday, but I would guess it had to be at least 500 people.  I got a lot of positive feedback and many leads.  I offered a drawing for a gift certificate toward a faux finish and got 33 people that entered.  Last year I think I only got 7 or 8 entries.  That’s a pretty good increase if you ask me.

I enjoy doing the EXPO, and love that my husband John joins me in the booth.  He really believes in me and it shows when he talks to people about my work. 

The booth is all packed up and ready to be put away until next time.  So… now the fun begins.  It’s time to start making those follow-up calls and schedule some appointments. 

Thursday, February 19, 2009

Preparing for the Business Expo

Lately, I’ve been enjoying the opportunity to create some new samples, refinish some furniture and build some columns.  I’ve been coming up with new things to show at our local business expo. 

Last year was my first time participating in it and I was fortunate to win the price of “most creative booth”.  It was a very nice surprise.  However, I am feeling a little pressure this year to make sure it’s just as good if not better.P2050003

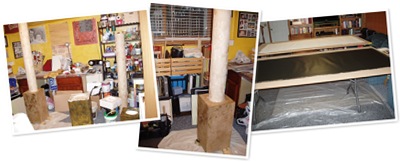
I’ve had the idea of building some faux columns.  I built the base out of wood and the column is pvc pipe.  Here is a picture of it before I’ve started painting it.  I’m testing it out in this spot, because I think I’ll keep them here by our patio door.  I think it’s the perfect solution, because we have no storage room.  They will fit in perfectly with the decor.

My studio has spilled over to the rest of the basement, because I was running out of room.  Here are some pictures of my very messy studio and some of the projects I’m working on.

As you can see I’ve started painting the columns.  I really like the way the actual columns look.  I’ve redone the bases several times, because I haven’t gotten the look I’m going for.  John keeps telling me all the columns he has seen, the base matches the column.  So… after several attempts of giving them a different look, I’ve given in to making them match the column.  I’ll post the pictures when they are finished. 

On the table, the black and white things are banners I’m doing faux finishes on.  I’m going to hang them in my booth.  I’ve got so many ideas of what I want to do, but only four panels.  It’s been tough deciding which finish to choose.  As of this morning, I’ve got one finished it’s black with bronze and gold (unless I add a stencil to it). I think what I’m going to do for the other three is: one as a wall of 12x12 slate tiles.   One is going to be a neutral colorwash, with a gold design.  The last one is going to be girly, but I’m not quite sure what.  I’m thinking purple or pink with flowers and glitter.  I love adding the sparkles for girls rooms.

I’ve also been working on some furniture, this is new for me.  The first table is a coffee table I got from a friend who was selling it at a garage sale.  I’ve always wanted to do a checkerboard on a table, so here is my version of that.  Also, I’ve posted the before picture of the table.

coffee table before

P2040001

Here is another little table I’m working on, it’s still not finished.  It’s getting close though.

P2060006

P2180006

Ok, I’ve still got lots of work to get done before next Saturday.  I better get to it.  I’ll post pictures of my booth when it’s set up.

Tuesday, January 20, 2009

Foil sample boards...

The kids are back to school after their five day weekend. They got two days off because school was cancelled due to extreme cold and Monday off for Martin Luther King Day. Now that they are in school, I've got a chance to post my samples I made using my foils.


These first two are for a frame design to go around a 30' long mirror at a Salon I'm bidding on. They are very similar, the only difference is the second one doesn't have a color wash over the gold foiled design. The base is a copper metallic paint. Then I added some Van dyke brown, turquoise and gold.

I'm not a photographer and it's hard to get a good picture of anything metallic... at least for me.


This next one is my first attempt at matching our inspiration piece from 2008 Salon. I did this without my picture of the original with me. I can see now that there is more black showing than the original had and I need to add more of the magenta and blue to it. Back to the studio to work on this one. I also want to give the drip lines a little more color, so they don't look so washed out. Yep, the drips are part of the design. This has a black base with gold foil over it. Then a magenta and blue colorwash. Finally, the drips are added. This one gets messy, thank goodness for dropcloths. I like how this one is looking!

This last one isn't photographing the way I'd like it too. It looks pretty cool in person. It has an off white base coat. Next, I applied the clear halographic foil. I cut/tore the foil and placed it in sections, letting some pieces overlap to create more depth and interest. Finally, I added a turquise colorwash over the entire thing. I think this would be a cool look in a small bathroom (Joyce, your bathroom off the front door comes to mind). It would also look pretty cool on a ceiling.

Actually, I think I'm going to add some of the clear halographic foil to my basement ceiling. It has a stone texture to it and this will add a little umph (is that a word) to it, yet be subtle. It really looks cool when the light hits it, rainbow colors. Pictures of that will be coming soon.

Until next time....