Tuesday, February 10, 2009

My little painters.

I came across these pictures while searching through my disks of old photos.  I can laugh about it now, but at the time it was a nightmare.

We live on a hill, so we’ve got this cement wall outside our garage.  I suppose it’s to keep the hill in place, but it’s quite ugly.   One day, I was playing around and painting it to look like limestone.  I used those little bottles of acrylic paint you get at the craft store, mixed with a little glaze.  When I started it, I thought it would come off when it rained, so I was just testing things out to see how it would look.  Well, to my surprise two years later it was still there, unfinished and looking like crap. 

So, one day while I was doing some painting in the garage, Jake and Jess wanted to do some painting too.  This is nothing unusual, every time I paint they want to paint too.  I decided what the heck, I’ll let them paint the cement wall.  You can see some of the paint got on the wall. 

We (probably more me than John) decided just let them have fun.  It’s nice outside, we can just hose them off when they are done.  Yeah right!  This paint dried on them and it was a total nightmare to get off.  But look how much fun they had doing it.

Jess looks like a little boy here with her short hair and no shirt on.  I think we had two summers straight where she went topless.  Ahhh, to be a carefree little girl.  She’s six now and won’t even get changed without closing her door now.  I’m sure one day she’s going to hate these pictures, but they are so cute.

Wednesday, February 4, 2009

Mead’s house.

Here is a project I did for some very good friends of mine.  I’ve known them for about as long as I’ve known my husband.  It’s my husbands’ best buddy from high school.  I’ve painted every bedroom in their house and one of the bathrooms.  Today, I’m going to just show you the bathroom and two of the bedrooms (the other three were just painted, no faux finishing).

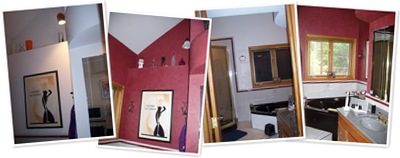
This bathroom is one they HATED.  It’s the bathroom off their master bedroom.  As you can see in the before pictures, it had plain white walls, with grey tiles and a burgundy accent tile.  Ideally, they would like to have gutted the entire thing.  However, since that wasn’t going to happen, I suggested “let’s just paint it”.  Our main goal was to make the burgundy tile work with the rest of the room.  Well, what better way to do that than make the walls burgundy.  I applied venetian plaster to the walls.  As you can see, it totally transformed the room.  I also painted the drywall around the tub a glossy black.  I think that made a big difference too. 

This is one of the most dramatic before and after examples I’ve got in my portfolio.  It was a lot of work; three coats of troweled on venetian plaster and a protective topcoat.  Absolutely worth it in the end.

This next room is the master bedroom.  It is just off the above bathroom. We wanted to make sure the bathroom and bedroom colors complemented each other.  For this one, I troweled on a base to give it some texture.  Then, I painted a base coat over the texture.  Finally, I did a colorwash to highlight the highs and lows of the textured walls.  As you can see it really warms up the room.  I just love the way these before and after shots look.  It’s amazing how it transformed the space from cold to warm and cozy.  And it was done with just a little faux finishing….. I love my job!

mead master 1 before

mead master 1 after


The most recent room I did for them was their daughter’s room.  This was really fun, because I got to do a surprise makeover of her room.  I was told she wanted orange walls and l think they said she liked purple and lime green too.  So, I went to IKEA to find some inspiration. 

I found a beautiful duvet cover and went from there.  I painted the walls a light orange (I felt like it was a big band-aid before the finishing touches were added).  I then painted the ceiling dark purple with a hand painted design in light green.  On one of the walls, I also painted some panels.  The panels were done the opposite of the ceiling, light green background with the design hand painted in purple.

The ceiling is definitely a one of a kind.  My neck was killing me by time I finished it.  If I ever do it again, I will used a stencil.  Oh, who am I kidding.  If someone asks, of course I’ll do it again.  It’s just like childbirth, you forget how much it hurts after awhile.  It looks really cool when you are laying on the bed looking up.  It was a successful makeover, she loved it.

Thank you to The Mead’s for giving me the freedom to “play” with their rooms.  I love you guys!

Monday, February 2, 2009

Meet my family…

Ok, so I’m still trying to figure out what all I want to include in my blog.  I started it mostly to show painting projects that I’m working on, thinking about, or have already completed.  But, part of me also wants to share some of my day to day craziness.  I hope I make sense and this doesn’t turn into some crazy mixed up jumbled mess (wait, that seems to describe my life perfectly).  Did I mention, I love spontaneity and seem to work my best under the pressure of a deadline?

I guess one of the first things I feel I need to say is… I was never good at writing.  I tend to have ALOT of run-on sentences and I’m not the best speller.  However, I think if you ever talk to me I probably talk in run-on sentences too.  When I have something to say I like to get it out there before I forget it.  And if I’ve had a lot of coffee or I’m really excited about something, watch out cuz I can talk really fast then.  By the way, I’m about finished with a half a pot of coffee at this point.

Wedding PictureSo, a little more about me and my family.  I’ve got a very  handsome husband, John is one of the nicest people I’ve ever known.  I’ve never known anyone to be so genuinely nice.  You can just tell it comes so naturally for him.  He is very supportive of my painting and business.  He doesn’t always see my vision, but he trust me and so far, he’s liked everything I’ve done.  He taught me that “everything happens for a reason”.  That is one of the most important things I’ve learned in my life.  It’s one of the three most precious gifts he’s given me.  The other two, are our wonderful children… Jake and Jessica (better known as Jess).

Jake 1Jake is eight and loves football, Brett Farve, baseball, PS2, Wii, and  music.  He adores his father.  From the time he was four, up until last year, he would dress like his dad almost every day.  I think he wore a shirt and tie to preschool/kindergarten 90% of the time, because he wanted to dress like dad.  He still prefers to be with his dad over anyone else.  He’s even turned down play dates with friends if dad is going to be home.  I hope they never lose that bond.

jess on boatJess is six and loves fashion, polly pockets, bratz, iCarly, and being  with her friends.  She is my little social butterfly.  She comes up with the craziest outfits, but you gotta love them.  Although we are already butting heads over some of them.  She doesn’t seem to understand why tanktops aren’t appropriate in the winter.  Jess is the sweetest girl, most of the time.  Lately, she has been testing out how far she can get with the sassiness and showing some attitude.  I can see many confrontations in our future, but for now, I’m enjoying the sweetness and trying to nip the attitude in the butt.  I know, I know I’ve got a long road ahead of me.  So far though, I can say her kindness, sense of humor and the fact  I think she is so darn cute is outweighing those sassy moments.

Let’s see, what else?  Oh, we currently have three cats. 

P2020028The first one we got was Spooner Baby (commonly referred to as Spoonie).  We got her from a shelter in Spooner Wisconsin in 2005. She is really friendly and doesn’t let any of our guests visit without giving her some of their attention.  She’s kinda long haired, tiger colored with white. 


The second one we got is Jelly Bean.  We got him on Easter in 2006  from my parents.  He is the coolest cat, everybody LOVES him.  He is a big fluffy moosh ball.  He loves to be held and just flops over your shoulder.  Unfortunately, the past several months he has been having some kidney problems.  Looks like we are going to have to get him on a special diet to try and prevent his reoccurring kidney infections.jelly bean in backpackP2020018


Finally, our third cat is Cali.  Once again, she came from my parents.  She is Jelly Bean’s half sister.  We got her in August 2007, on my birthday.  Cali has no tail, just like her mother.  She is a nice cat, a little more stand-offish than the other two.  We are currently trying to find her a new home.  She is too young to be on the special diet that Jelly needs to be on and it’s too hard to try and keep it separate.  Plus, I must admit John was right three cats is too many.

P2020013 P2020023

Ok, so now you’ve met my family.  I’ll be posting updates on us as well and my projects and anything else I find interesting to share.  Like I said, hopefully you can follow my writing and make some sense of it.  Just remember, I’m a painter not a writer. 

By the way, if you’ve got the time, leave me some comments.  This way I know I’m not just talking/writing to myself.  Enjoy the day!

Wednesday, January 28, 2009

The Bachelor’s Pad

Here are some photos from a job I did a few years ago.  This was to be a new home for a newly single man.  I would describe his style as modern and contemporary. My first meeting for this project was to see the place, meet the Interior Designer and give some ideas for a bathroom.  I ended up getting the original bathroom, in addition to painting the foyer, an accent wall master bedroom and master bathroom.  The homeowner really liked my ideas. 

The original bathroom had a grey tiled shower and white cabinets.  We went with a plum brown strie over light grey.  After completing the walls, I recommended doing grey storm clouds on the ceiling.  It really added to the room.

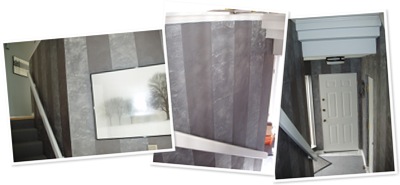
The next project was the foyer.  He really liked my sample of a striped Luster Stone.  For some reason, this reminds me of a tuxedo.  I’m not sure why, it just gives me the feel of manly elegance.  What a great statement to make when you first enter his home.

On to the next wall.  For his accent wall, which is actually the backside of his kitchen.  He had stated that he really likes the look of slate.  So, my response to that was “let’s go pick out a piece of slate to duplicate”.  This turned into our first shopping trip of many to come.  We selected a piece of slate, so off to my studio to replicate it.  (Now, I’m really wishing I kept that piece of slate to show the comparison.)  The sample turned out awesome.  It was a four layer process with textures and blending colors on the wall.  I think it turned out really nice and really compliments the colors throughout the house.

I can’t remember if the master bedroom or master bathroom came next.  I think it was the master bedroom.

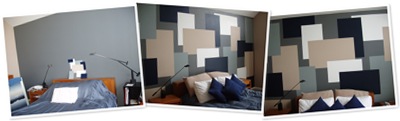
After working there awhile on the other rooms, I really felt like I was getting to know his taste and personality.  He had just had is master bedroom painted, but I felt it was really missing something.  I came up with the idea of colorblocking on the headboard wall.  From there, he added his idea of incorporating “the perfect rectangle”.  This is something he is very interested in, so he gave me the measurements for “the perfect rectangle”.   To date, I think this wall has the most dramatic impact of any room I’ve done.  It really draws you into the room (I guess that’s probably not a bad thing for as single guy).

The master bathroom ended up requiring a little trust on his part.  As you may have notices there is a theme going of blues and greys.  The master bathroom was no exception.  We decided we were going to go with a textured finish with a color wash over it.  The base was a light tan and he wanted a blue color wash on top.  I had suggested adding both blue and brown for the color wash.  He didn’t like the idea of the brown, so I did as he requested.  Unfortunately, when I started, we decided it looked like a dead persons flesh… not a very pretty sight I know.  Here is where the trust came into play.  I suggested once again adding some brown and blue blending them as I go.  (Of course, with the guarantee it would be redone if he didn’t like it.)  Lucky for me, he really liked it and I was able to finish the room.

After all the work of painting and decorating was done, it was time for him to move in and have a party.  As a housewarming gift, I decided to paint him yet one more thing.  I created this piece of artwork to go in his master bathroom.al's bath 4

This project really was a learning experience for me.  It was my first job that started as one room and turned into several rooms.  I was also able to assist in a lot of the decorating and shopping.  Not only did I have fun working on this project, I also gained a new friend. 

Yet another reason I love my job.

Tuesday, January 20, 2009

Foil sample boards...

The kids are back to school after their five day weekend. They got two days off because school was cancelled due to extreme cold and Monday off for Martin Luther King Day. Now that they are in school, I've got a chance to post my samples I made using my foils.


These first two are for a frame design to go around a 30' long mirror at a Salon I'm bidding on. They are very similar, the only difference is the second one doesn't have a color wash over the gold foiled design. The base is a copper metallic paint. Then I added some Van dyke brown, turquoise and gold.

I'm not a photographer and it's hard to get a good picture of anything metallic... at least for me.


This next one is my first attempt at matching our inspiration piece from 2008 Salon. I did this without my picture of the original with me. I can see now that there is more black showing than the original had and I need to add more of the magenta and blue to it. Back to the studio to work on this one. I also want to give the drip lines a little more color, so they don't look so washed out. Yep, the drips are part of the design. This has a black base with gold foil over it. Then a magenta and blue colorwash. Finally, the drips are added. This one gets messy, thank goodness for dropcloths. I like how this one is looking!

This last one isn't photographing the way I'd like it too. It looks pretty cool in person. It has an off white base coat. Next, I applied the clear halographic foil. I cut/tore the foil and placed it in sections, letting some pieces overlap to create more depth and interest. Finally, I added a turquise colorwash over the entire thing. I think this would be a cool look in a small bathroom (Joyce, your bathroom off the front door comes to mind). It would also look pretty cool on a ceiling.

Actually, I think I'm going to add some of the clear halographic foil to my basement ceiling. It has a stone texture to it and this will add a little umph (is that a word) to it, yet be subtle. It really looks cool when the light hits it, rainbow colors. Pictures of that will be coming soon.

Until next time....

Saturday, January 17, 2009

Foil sample ideas...

Today, my plan is to play around and make some samples with my foils (I say play, because it really doesn't feel like work when I'm in the studio). I've got a couple ideas I want to work on.

First one is a sample for a job I'm bidding on. I need to create a frame to go around a 30' long mirror. My idea is to do a copper textured finish with a gold foil stencil.

Second one is for my very dear friend, Joyce. We saw this painting at the 2008 Salon.

Painting by: Lauren Childs

We decided that something like this would look awesome above her fireplace.


And finally, I want to create a sample with my clear halographic foil. I saw a picture of a finish in Gary Lord's book "It's Faux Easy with Gary Lord".

So, down to the studio I go. I'll post pictures of the completed samples.

Thursday, January 15, 2009

The "Outhouse" project

This has got to be my favorite project I've done. My parents live in a log cabin, the one I grew up in. Off the kitchen is this little half bath. I think from the time I started painting I was telling them they should let me paint it to look like an outhouse. Finally, a couple years ago they gave me the go ahead. I wood grained the walls (except the existing log wall), wood grained the door and built a wood bench around the toilet. I also wood grained the cabinet and replaced the doors for a more rustic look.


I started by patching and prepping the walls. My mom had already removed the wallpaper that was there.


Once the base coat was dry, I taped of the sections for each board and wood grained them. I let them dry, then taped of and did the next section.
Once the walls were wood grained to look like boards, I added the shading between the boards. I also added some knot holes and nails at the top and bottom of each board.

I followed the same technique for the doors, but also added the "Z" cross boards on the front and back of the door.
I love the way this door turned out. It sure shows how a little shading and highlights can give it dimension. Would you have guessed it's a flat door?
Once I got started, my dad said he wanted a mouse hole too. So, I added a little mouse hole and a mouse... actually, it's a little bigger than I'd like, so it's more of a cute little rat. I'm very happy with the way the room turned out, it fits in perfectly with their rustic decor.

Recently, I was there to paint the kitchen walls outside the bathroom to look like stone. I'll post more on that later.